|
Quick Table of Contents
[Edit] What is HTML?
Let ’ s have a look at a very simple web page. example <html>
<head>
<title> Popular Websites: Google </title>
</head>
<body>
<h1> About Google </h1>
<p> Google is best known for its search engine, although
Google now offers a number of other services. </p>
<p> Google’s mission is to organize the world’s
information and make it universally accessible and
useful. </p>
<p> Its founders Larry Page and Sergey Brin started
Google at Stanford University. </p>
</body>
</html>Try it yourself »Click on the "Try it yourself" button to see how it works This may look a bit confusing at first, but it will all make sense soon. As you can see, there are several sets of angle brackets with words or letters between them, such as < html > , < head > , < /title > , and < /body > . These angle brackets and the words inside them are known as tags , What is HTML? It is a special kind of text document that is used by Web browsers to present text and graphics. The text includes markup tags such as <p> to indicate the start of a paragraph, and </p> to indicate the end of a paragraph. HTML documents are often refered to as "Web pages". The browser retrieves Web pages from Web servers that thanks to the Internet, can be pretty much anywhere in World. This page will teach you how to:
[Edit] start with a title
Every HTML document needs a title. Here is what you need to type: <html> <title>My first HTML document</title> </html> Change the text from "My first HTML document" to suit your own needs. The title text is preceded by the start tag <title> and ends with the matching end tag </title>. The title should be placed at the beginning of your document. To try this out, type the above into a text editor and save the file as "test.html", then view the file in a web browser. If the file extension is ".html" or ".htm" then the browser will recognize it as HTML. Most browsers show the title in the window caption bar. With just a title, the browser will show a blank page. Don't worry. The next section will show how to add displayable content. 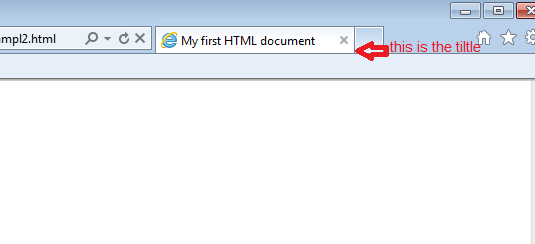 [Edit] Add headings and paragraphs
If you have used Microsoft Word, you will be familiar with the built in styles for headings of differing importance. In HTML there are six levels of headings. H1 is the most important, H2 is slightly less important, and so on down to H6, the least important. Here is how to add an important heading: <h1>An important heading</h1> and here is a slightly less important heading: <h2>A slightly less important heading</h2> heading
Each paragraph you write should start with a <p> tag. The </p> is optional, unlike the end tags for elements like headings. For example:
<h1>An important heading</h1>

<h2>A slightly less important heading</h2>
Try it yourself »Click on the "Try it yourself" button to see how it works paragraph <p>This is the first paragraph.</p> <p>This is the second paragraph.</p> Try it yourself »Click on the "Try it yourself" button to see how it works [Edit] Adding a bit of emphasis
Adding a bit of emphasis You can emphasize one or more words with the <em> tag also you can make the text bold using <b> tag <html> <em>interesting</em> topic!<br/> <b> bold </b>text </html> Try it yourself »Click on the "Try it yourself" button to see how it works [Edit] Adding interest to your pages with images
images can be used to make your Web pages distinctive and greatly help to get your message across. The simple way to add an image is using the <img> tag. Let's assume you have an image file called "peter.jpg" in the same folder/directory as your HTML file. It is 200 pixels wide by 150 pixels high. <img src="peter.jpg" width="200" height="150">The src attribute names the image file. The width and height aren't strictly necessary but help to speed the display of your Web page. Something is still missing! People who can't see the image need a description they can read in its absence. You can add a short description as follows: <img src="peter.jpg" width="200" height="150" alt="My friend Peter">The alt attribute is used to give the short description, in this case "My friend Peter". For complex images, you may need to also give a longer description. Assuming this has been written in the file "peter.html", you can add one as follows using the longdesc attribute: <img src="peter.jpg" width="200" height="150" alt="My friend Peter" longdesc="peter.html"> You can create images in a number of ways, for instance with a digital camera, by scanning an image in, or creating one with a painting or drawing program. Most browsers understand GIF and JPEG image formats, newer browsers also understand the PNG image format. To avoid long delays while the image is downloaded over the network, you should avoid using large image files. Generally speaking, JPEG is best for photographs and other smoothly varying images, while GIF and PNG are good for graphics art involving flat areas of color, lines and text. All three formats support options for progressive rendering where a crude version of the image is sent first and progressively refined. [Edit] Adding links to other pages
What makes the Web so effective is the ability to define links from one page to another, and to follow links at the click of a button. A single click can take you right across the world! Links are defined with the <a> tag. Lets define a link to the page defined in the file "peter.html" in the same folder/directory as the HTML file you are editing: This a link to <a href="peter.html">Peter's page</a>.The text between the <a> and the </a> is used as the caption for the link. It is common for the caption to be in blue underlined text. If the file you are linking to is in a parent folder/directory, you need to put "../" in front of it, for instance: <a href="../mary.html">Mary's page</a>If the file you are linking to is in a subdirectory, you need to put the name of the subdirectory followed by a "/" in front of it, for instance: <a href="friends/sue.html">Sue's page</a>The use of relative paths allows you to link to a file by walking up and down the tree of directories as needed, for instance: <a href="../college/friends/john.html">John's page</a>Which first looks in the parent directory for another directory called "college", and then at a subdirectory of that named "friends" for a file called "john.html". To link to a page on another Web site you need to give the full Web address (commonly called a URL), for instance to link to www.w3.org you need to write: links
You can turn an image into a hypertext link, for example, the following allows you to click on the company logo to get to the home page:
This is a link to <a href="http://www.w3.org/">W3C</a>. Try it yourself »Click on the "Try it yourself" button to see how it works <a href="/"><img src="logo.gif" alt="home page"></a> Try it yourself »Click on the "Try it yourself" button to see how it works This uses "/" to refer to the root of the directory tree, i.e. the home page. [Edit] Three kinds of lists
HTML supports three kinds of lists. The first kind is a bulletted list, often called an unordered list. It uses the <ul> and <li> tags, for instance: Example
Note that you always need to end the list with the </ul> end tag, but that the </li> is optional and can be left off. The second kind of list is a numbered list, often called an ordered list. It uses the <ol> and <li> tags. For instance:
<ul>
  <li>the first list item</li>

  <li>the second list item</li>

  <li>the third list item</li>
</ul>
Try it yourself »Click on the "Try it yourself" button to see how it works Example
Like bulletted lists, you always need to end the list with the </ol> end tag, but the </li> end tag is optional and can be left off.
The third and final kind of list is the definition list. This allows you to list terms and their definitions. This kind of list starts with a <dl> tag and ends with </dl> Each term starts with a <dt> tag and each definition starts with a <dd>. For instance:
<ol>
  <li>the first list item</li>

  <li>the second list item</li>

  <li>the third list item</li>
</ol>
Try it yourself »Click on the "Try it yourself" button to see how it works Example
The end tags </dt> and </dd> are optional and can be left off. Note that lists can be nested, one within another. For instance:
<dl>
  <dt>the first term</dt>
  <dd>its definition</dd>

  <dt>the second term</dt>
  <dd>its definition</dd>

  <dt>the third term</dt>
  <dd>its definition</dd>
</dl>
Try it yourself »Click on the "Try it yourself" button to see how it works Example
<ol>
  <li>the first list item</li>

  <li>
    the second list item
    <ul>
      <li>first nested item</li>
      <li>second nested item</li>
    </ul>
  </li>

  <li>the third list item</li>
</ol>
Try it yourself »Click on the "Try it yourself" button to see how it works You can also make use of paragraphs and headings etc. for longer list items. [Edit] HTML has a head and a body
If you use your web browser's view source feature (see the View or File menus) you can see the structure of HTML pages. The document generally starts with a declaration of which version of HTML has been used, and is then followed by an <html> tag followed by <head> and at the very end by </html>. The <html> ... </html> acts like a container for the document. The <head> ... </head> contains the title, and information on style sheets and scripts, while the <body> ... </body> contains the markup with the visible content. Here is a template you can copy and paste into your text editor for creating your own pages:
<!DOCTYPE html PUBLIC "-//W3C//DTD HTML 4.01 Transitional//EN"
    "http://www.w3.org/TR/html4/loose.dtd">
<html>
<head>
  <title> replace with your document's title </title>
</head>
<body>

replace with your document's content

</body>
</html>
Try it yourself »Click on the "Try it yourself" button to see how it works |
This Page is Under Construction! - If You Want To Help Please Send your CV - Advanced Web Core (BETA)

FOLLOW AWCORE
- Follow Us:


© Advanced Web Core. All rights reserved